
QT3-1 Tag Quick Start Guide
Thank you for purchasing the Quuppa QT3-1 Tag!
The QT3-1 Tag is the first Quuppa v3 Tag and works with Generation Q Locators. Please note that the QT3-1 Tag is compatible with the Quuppa system release 8.0 or above.
Note:
Before you start setting up, update your system to the
software release 8.0 or newer. Also update the Locator Firmware. To do so, follow
these steps:
- Software - download the latest version from the Downloads section in the QCP and update the QPE on your Quuppa Controller. Alternatively, if you are running the system on a Quuppa Development Kit Controller computer, you can use the Update Controller icon available on the desktop.
- Locator Firmware - connect the Locators to the Quuppa Controller and follow the instructions in the Upgrade Firmware for All Locators section.
Provisioning
The easiest way to provision your new QT3-1 Tag is to use the Quuppa system feature called auto-configuration. For using the auto-configuration feature:
- Open a project in the QSP.
- In the object tree on the left, select the project
file.

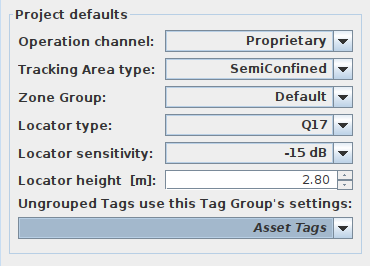
- In the Project defaults section in the panel on the right,
select a tag group that you want to use as the default for all new (ungrouped)
tags. The tag group you select should have some target configuration - if you
don't know what type of tag configuration you need, suggestion is to use
Asset Tags.
- Submit the project in QSP and run Do File Sync in the QPE web console.
- Remove a QT3-1 Tag from its packaging.
- Activate the QT3-1 Tag by pressing the Tag's button within the coverage area of your Quuppa system.
- The QPE will then automatically configure the Tag based on its selected Tag Group.
- You can verify the tag has been configured by looking at the
'currentConfigValueName' field in the QPE web console Tag
Details page. The 'currentConfigValueName' should match with the
configuration in the tag group you selected.
 Note:'currentConfigValueName' is hidden by default in the Tag Details page. You can make it visible clicking Hide/show fields button at the bottom of the page and then selecting to show 'currentConfigValueName' field.
Re-configuration
The QT3-1 Tag can be re-configured by following steps similar to provisioning:
- In QSP project settings, select a (different) tag group you want to use as the
default for all new (ungrouped) tags.

- Submit the project in QSP and run Do File Sync in the QPE web console.
- You can verify the tag has been re-configured by looking at the
'currentConfigValueName' field in the QPE web console Tag
Details page.

- In case the configuration of your QT3-1 Tag is not automatically updated in the table, press the button of the tag to re-activate.
- Your new QT3-1 Tag is now re-configured with the new configuration.
If you have any further questions or require additional support, please contact Quuppa Support at support@quuppa.com.